Last updated: April 3, 2026
I've cooked over three hundred pork shoulders in twenty years of competing. I've placed in KCBS events, I've bombed spectacularly in front of judges, and I've served enough pulled pork at backyard parties to fill a swimming pool. This recipe is the distillation of everything I've learned — not the simplified version I'd tell a beginner, but the full competition method with injection, overnight rub application, and a specific bark-building strategy that produces pork shoulder you can put in front of judges or guests with equal confidence.
This is a 14-16 hour cook. There are no shortcuts that don't compromise the result. If you want pulled pork in 6 hours, buy a pressure cooker. If you want pulled pork that makes people stop talking mid-sentence, keep reading.
One more thing: this recipe assumes you have a thermometer you trust. If you don't own a reliable digital thermometer — something like a ThermoWorks Thermapen or even a decent ThermoPro — stop reading, buy one, and come back. Cooking a 14-hour pork shoulder without accurate temperature monitoring is like driving blindfolded. You might arrive safely, but probably not.
Competition-Style Pork Shoulder — 14-Hour Smoke with Injection
Scan for full recipe
https://bbq-experience.com/en/recipes/competition-style-pork-shoulder-14-hour-smoke
Ingredients
- 1 bone-in Pork shoulder (Boston butt), 8-10 lbs, with fat cap intact
- --- INJECTION ---
- 1 cup Apple juice (not from concentrate)
- 0.5 cup Water
- 0.3 cup Apple cider vinegar
- 2 tbsp Worcestershire sauce
- 1 tbsp Kosher salt
- 1 tbsp Brown sugar
- 1 tsp Garlic powder
- 0.5 tsp Cayenne pepper
- --- RUB ---
- 0.3 cup Coarse kosher salt (Diamond Crystal, NOT Morton's — Morton's is 1.5x saltier by volume)
- 0.3 cup Coarse black pepper
- 2 tbsp Paprika (Hungarian sweet, not smoked — the smoke comes from the cooker)
- 2 tbsp Dark brown sugar
- 1 tbsp Garlic powder
- 1 tbsp Onion powder
- 1 tsp Cayenne pepper
- 1 tsp Ground cumin
- 0.5 tsp Dried thyme
- --- SPRITZ ---
- 2 cups Apple juice
- 1 cup Apple cider vinegar
- Mix in a spray bottle
- --- OPTIONAL WRAP (if stalling beyond 6 hours at plateau) ---
- Heavy-duty aluminum foil or peach butcher paper
- 0.3 cup Apple juice for wrap
- 2 tbsp Butter
Instructions
- 1
Prepare the injection (night before)
Combine all injection ingredients in a saucepan over medium heat. Stir until salt and sugar dissolve completely. Do NOT boil — just warm enough to dissolve. Cool to room temperature, then refrigerate. Cold injection penetrates more evenly than warm.
- 2
Inject the pork shoulder (night before)
Using an injection syringe with a multi-hole needle, inject in a 1-inch grid pattern across the entire shoulder. Insert the needle fully, then inject while slowly pulling out — this distributes the liquid in layers rather than creating a pocket. Inject from multiple angles. You're aiming to get about 1-1.5 cups of injection into an 8-10 lb shoulder. There will be runoff. That's normal.
- 3
Apply the rub (night before)
Mix all rub ingredients thoroughly. Apply a generous coating to all surfaces of the shoulder — top, bottom, sides. Don't be gentle. Press the rub into the meat, especially into crevices and folds. You want a visible, thick layer. Wrap tightly in plastic wrap and refrigerate overnight — minimum 8 hours, maximum 24 hours. This dry-brine period lets the salt penetrate while the sugar begins to develop the foundation for bark.
- 4
Fire setup — 225°F target
Set up your smoker for 225°F. On an offset, build a coal bed and add one split of your chosen wood (hickory, oak, or cherry — avoid mesquite for pork). On a kamado, fill the firebox with lump charcoal and add 2-3 wood chunks. On a pellet smoker, set to 225°F and let it stabilize for 15 minutes. On a Weber Smokey Mountain, use the Minion method with a full ring of unlit charcoal, 4-5 wood chunks placed around the ring, and a chimney of lit charcoal dumped in the center.
- 5
Place the shoulder — fat cap debate
Place the shoulder on the grate fat-cap UP in an offset (heat comes from above via convection), fat-cap DOWN in a kamado or WSM (heat comes from below). The fat cap protects the meat from the primary heat source. Insert your probe thermometer into the thickest part of the shoulder, avoiding bone. Target internal temperature: 203°F. You will not touch this probe again until the meat is done.
- 6
Hours 1-3: Leave it alone
Maintain 225°F. Do not open the cooker. Do not spritz. Do not peek. The bark cannot form if you keep opening the lid. Smoke should be thin and blue, never white and billowing. If you see thick white smoke, your fire is smoldering — add more airflow or a smaller, hotter fire.
- 7
Hours 3-8: Spritz and maintain
Starting at hour 3, spritz the shoulder with the apple juice/vinegar mixture every 45-60 minutes. Quick spritz — open, spray, close. The entire lid-open time should be under 10 seconds. The spritz serves two purposes: it keeps the surface moist enough to continue absorbing smoke, and the sugar in the apple juice helps develop a deeper, mahogany-colored bark. During this period, you'll hit 'the stall' — internal temp will plateau around 150-165°F as evaporative cooling balances heat input. This is normal. Do not panic. Do not crank the heat.
- 8
The Stall (typically hours 5-9): Patience or paper
The stall can last 2-6 hours depending on the size of your shoulder and the humidity in your cooker. You have two options. Option A (competition method): push through the stall without wrapping. This produces the best bark — thick, crunchy, deeply flavored. It also takes longer. Option B (Texas crutch): when internal hits 165°F and has stalled for more than 90 minutes, wrap in butcher paper (not foil — foil steams the bark off) with a splash of apple juice and butter. This breaks through the stall in 1-2 hours but produces a softer bark. I use Option A for competitions and Option B when I need dinner on the table by a specific time.
- 9
Targeting 203°F internal — the probe test
The pork shoulder is done when the internal temperature reaches 203°F AND the probe slides into the meat with zero resistance — like inserting it into warm butter. Temperature is necessary but not sufficient. I've had shoulders hit 203°F and still feel tight on the probe — they needed another 30-45 minutes at 200-205°F before the collagen conversion was complete. The probe test is the real indicator. When in doubt, keep cooking.
- 10
Rest — the step most people skip
Remove the shoulder from the cooker. If wrapped, keep it wrapped. If unwrapped, wrap it now in butcher paper or foil. Place it in a dry cooler (no ice) and close the lid. Rest for MINIMUM 1 hour, ideally 2-3 hours. The shoulder will stay above 145°F (safe serving temp) for up to 4-5 hours in a good cooler. This rest period allows the juices to redistribute and the collagen to continue setting. Pulling a shoulder immediately off the cooker gives you drier, less tender pork. Every time.
- 11
Pull and serve
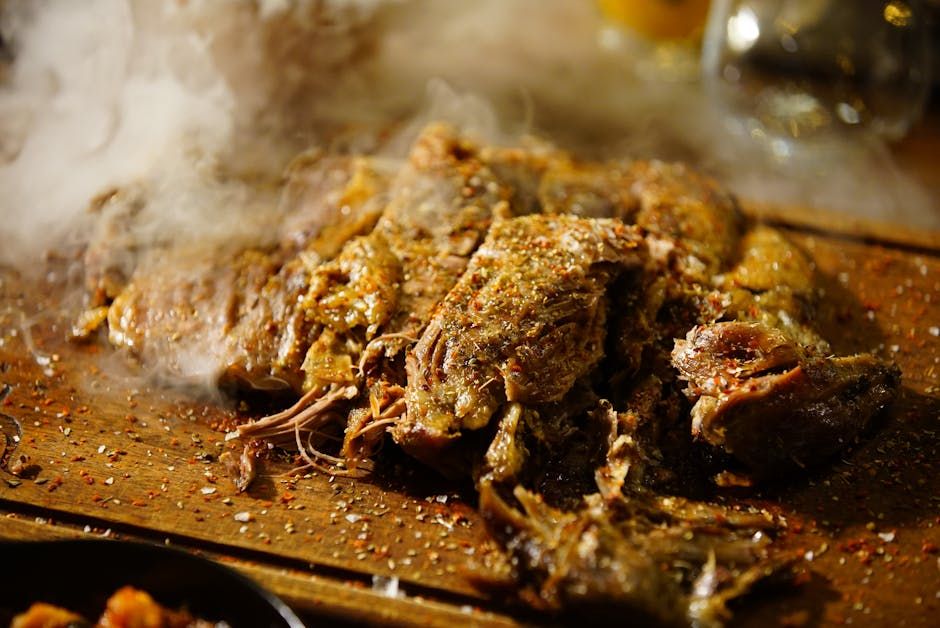
Unwrap the shoulder over a sheet pan — the collected juices are liquid gold. Pull the pork by hand using heat-resistant gloves or bear claws (forks shred too fine for my taste). Remove the bone — it should slide out cleanly. Remove any large chunks of unrendered fat. Mix the collected juices back into the pulled pork. Season with a light additional dusting of rub if desired. Serve immediately or hold in a covered pan at 165°F for up to 2 hours.
Related Recipes
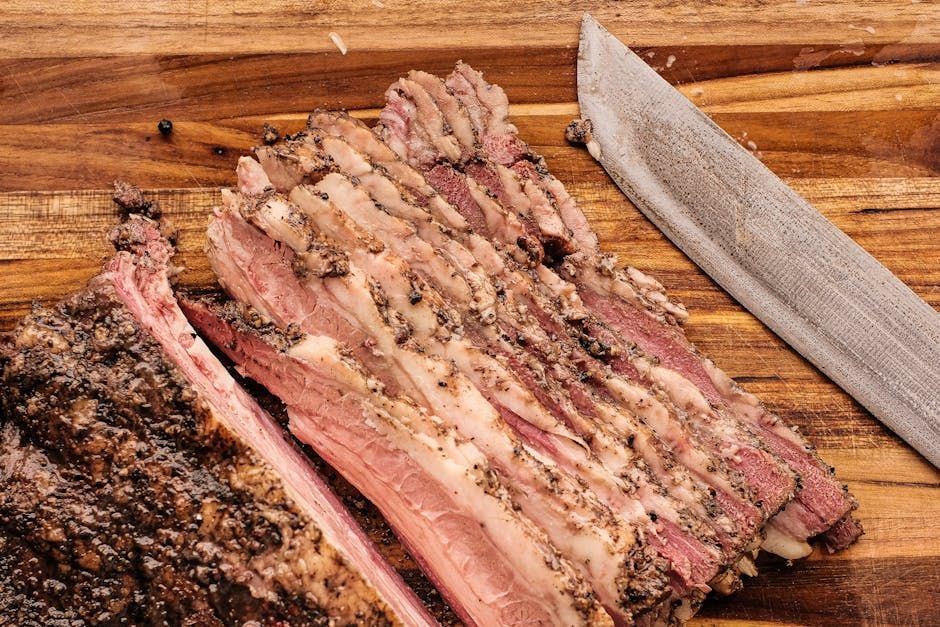
Burnt Ends — Kansas City Style, From the Brisket Point
Real burnt ends come from the point of a whole packer brisket, not from pre-cubed chuck roast or pork belly shortcuts. Here's the full method: smoke the whole brisket, separate the point, cube it, sauce it, and send it back for the caramelization that makes burnt ends legendary.
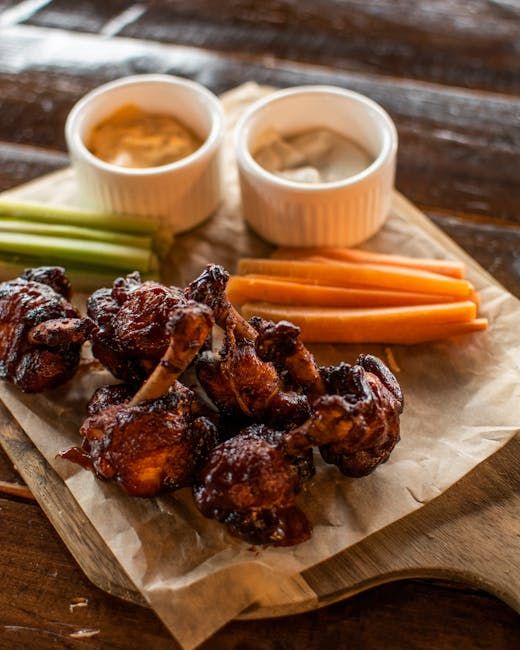
Smoked Chicken Wings — Crispy Without Frying
The baking powder trick, the high-heat finish, and the sauce timing that gives you competition-crispy smoked wings without a drop of frying oil. 90 minutes start to finish.
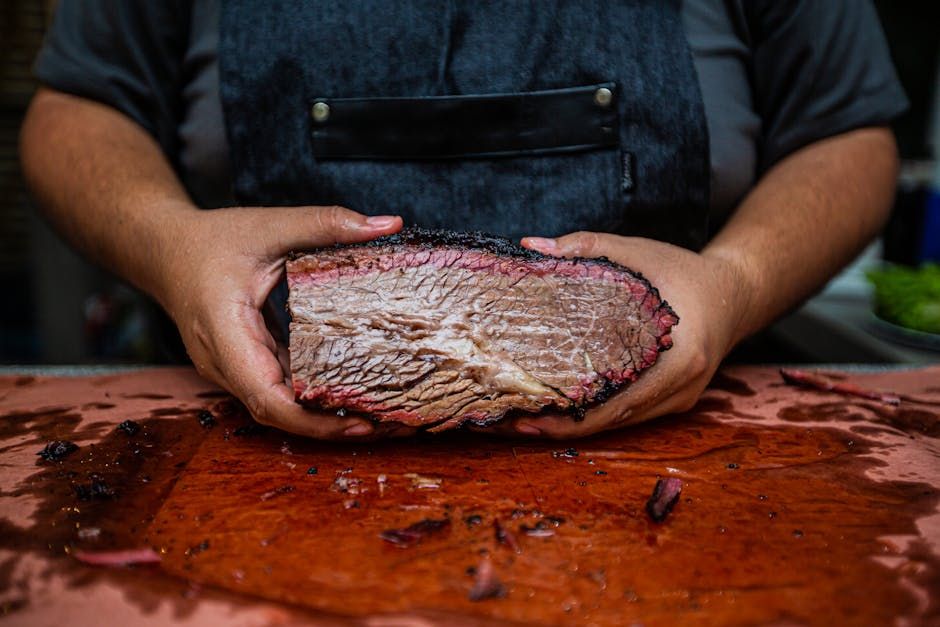
Texas-Style Smoked Brisket
The real deal. No shortcuts, no injections, no wrapping if you have the patience. Salt, pepper, post oak, and 14 hours of your life you will never regret. This is the cook that separates pitmasters from grillers.